AnimToSprite Manual -Afterimage Effect-

A2S documentation has been moved to the Wiki.

This page may not be up-to-date.

github.com


AnimToSprite Manual -Afterimage Effect-

A2S Version 1.9 provides a component to add afterimage effects.

It is a bit heavy because it spawns Actors, but it is a useful effect.


Caution :

This is only for AnimSpriteRender component (provided by A2S).

Paper2D will be supported in a later version.


How to use

1. Attach component

Add BP_SpriteAfterImageSpawner to an actor which has AnimSpriteRender component.


2. Activate

This component is not activated by default.

Use Activate function or check "Auto Activate" in the Details.


Customization

You can control the appearance of afterimages by creating materials or changing the properties.

Properties

-CaptureMaterial:

The material used to create textures for afterimages.

This is less likely to be modified.

-SpawnRate

Number of spawned afterimage sprite per second.

-AfterImageMaterial

The material that determines the appearance of the afterimage sprites.

-LifeSpan

-ColorOverTime

Used in the standard (provided) AfterImageMaterial to define the colors and opacities of afterimage sprites over time.

-AutoActivate

If checked, the afterimage effect will be active when the game starts.

Examples

1. Default


2. Spawn Rate

Spawn rate can be modified in the Details of the component.


3. Color

You need to create a pair of LinearColorCurve and CurveAtlas.

Of course, replacing AfterImageMaterial also works.


4. Using sprite colors

(The latest version of A2S contains this material as "M_SpriteAfterImage_Colored").

You need to your customized material (based on provided M_SpriteAfterImage).

Use the RGB channel of the "Texture" in some way.

AnimToSprite Manual -Wake Sprite Option-

A2S documentation has been moved to the Wiki.

This page may not be up-to-date.

github.com


Anim To Sprite "Wake-up Sprite Option"

Summary

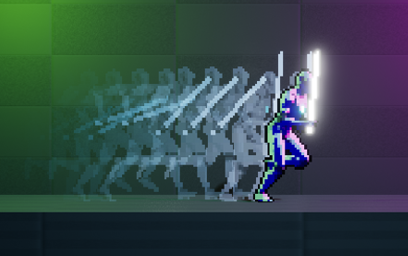
Intersections between 3D backgrounds and camera-facing sprites are often problematic, especially in Top-View games.


The Wake-up option eliminates this problem to some extent, but should be implemented with caution because it does not work well from a near-vertical perspective and other side effects are to be expected.
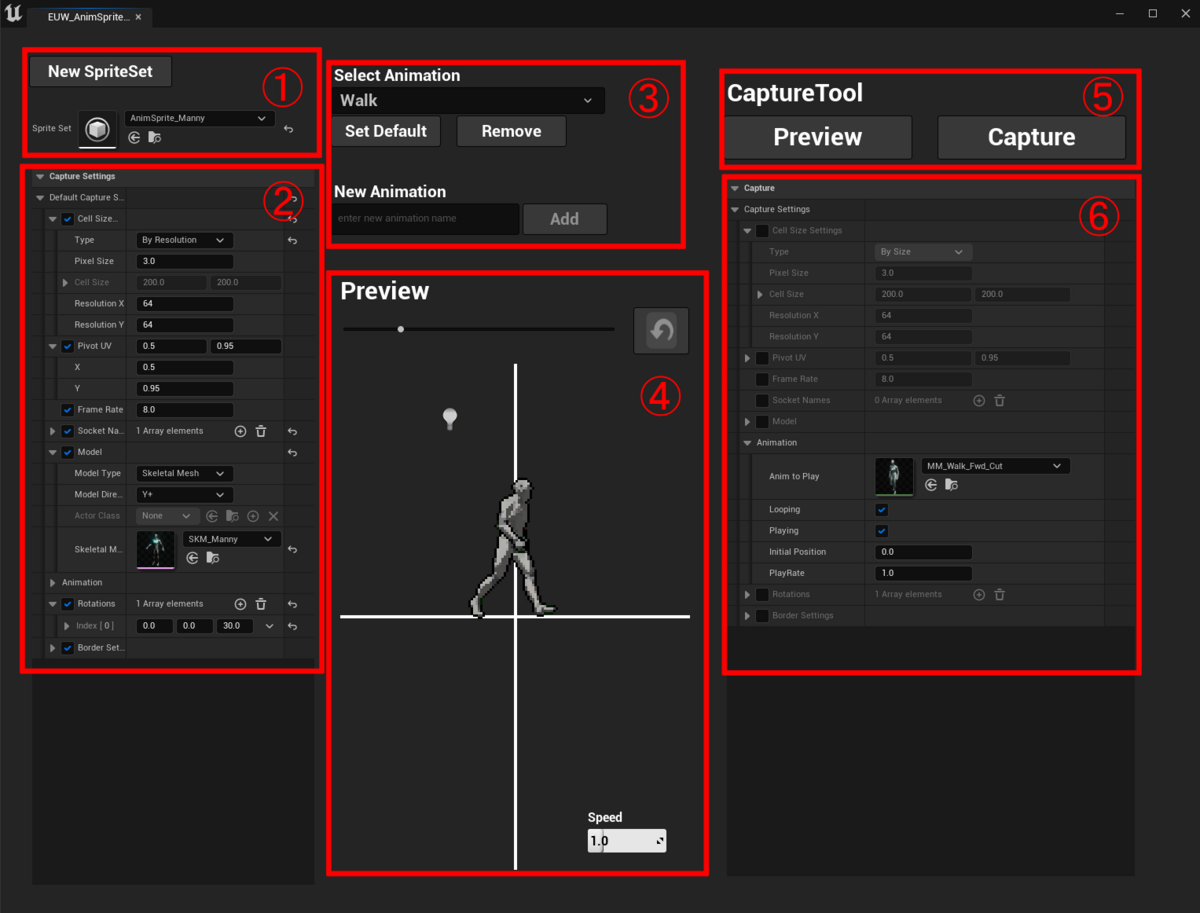
 

How to setup

When using material instances based on embedded materials (M_AnimSprite/M_AnimSprite_Toon), check "bWakeSprite" to enable this option.

"WakeRate" determines the strength of its effect.


If you use your original material, just immitate M_AnimSprite.

MF_WakeSprite does the calculation.


Then check "Use Subdivided Mesh" in the details of AnimSpriteRender component.


Technical Explanation

This section describes the actual effect of this option.
This may help in analyzing the side effects that would occur.


Wake Sprite option offsets the vertices toward the camera so that the mesh stands vertically.

This requires a subdivided mesh to deter image distortion.

A2S provides a quad mesh subdivided into 8x8 rectangles.

AnimToSprite Manual -Additional Textures-

A2S documentation has been moved to the Wiki.

This page may not be up-to-date.

github.com


Anim To Sprite Additional Textures

In addition to BaseColor and Normal, customized textures can be captured.

This is a slightly advanced option.

To use the additional textures, you need to develop a customized material (based on M_AnimSprite).

How to setup

Optional Captures (from presets) : ver 1.7 and later

To add optional captures from presets, fill "Optional Captures."

SRM(Specular,Roughness,Metallic), SeparateOutline and Emissive are defined (ver 1.7).

Presets can be edited in ProjectSettings->AnimToSprite but you need to be careful about modifying this.

Custom Captures

This is more advanced usage.

To create customized additional textures(captured with your own post process materials), fill "Custom Captures" with postprocess material and texture name.

Texture name("MyChannel" in this image) needs to reflect the material parameter name. 

If your material doesn't have a corresponding (and active) parameter, it is simply ignored.

"Draw Material" expects a post process material to define the final pixel color.

If you use Paper2D workflow, "Paper2DAdditionalTextureIndex" is used instead of the parameter name.

Caution about capturing

First capture may fail due to material not being compiled in time.

Please check the resulting texture (browse button is good for this).

Making your postprocess material for custom captures

As an example, a material for Specular, Roughness and Metallic is provided (PP_SpecularRoughnessMetallic).

Might be a good place to start by duplicating this.
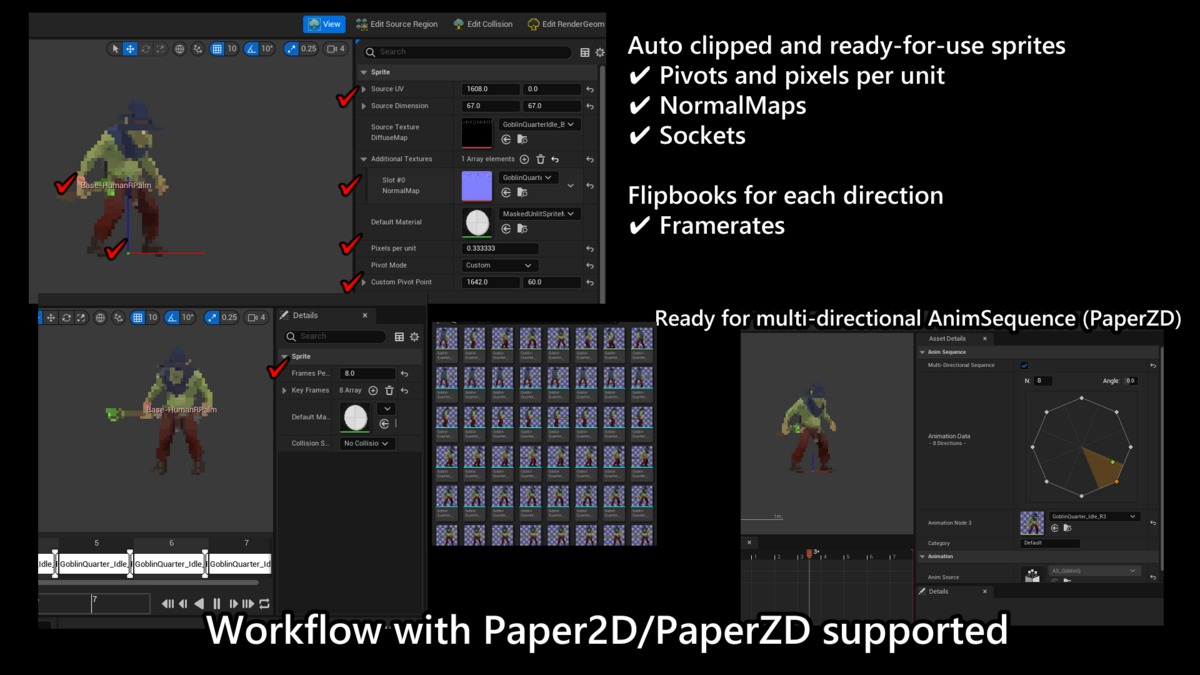
Paper2D support

Additional textures are also setup into Paper2D Sprites.

In this case, texture names in the capture settings are ignored and textures are added in order.

You need to make customized material to use these textures.

As an example, material using Specular, Roughness and Metallic is provided (M_Paper2DLitSRM).

Slot Index

The Slot Index is a hint as to what the texture is used for in the Paper2D sprite (instead of the material parameter name).

You need to set it up properly according to the material. additional texture slots are assigned as follows:

In the sample material "M_Paper2DLitSRM", 

Slot #0 : Normal (reserved)

Slot #1 : Specular, Roughness and Metallic

Slot #2 : Separate Outline

Slot #3 : Emissive

AnimToSprite Manual -Work with NiagaraSystem-

A2S documentation has been moved to the Wiki.

This page may not be up-to-date.

github.com


Anim To Sprite and Niagara Systems

Anim To Sprite supports capturing NiagaraSystems partially.

Limitations

Input

NiagaraSystems for ATS need these conditions:

  • Emitters need to be deterministic (fixed random seed)
  • Emitters need to be CPU sim
  • Materials should be opaque or masked, and its color is output to BaseColor
  • NiagaraComponent needs to be attached to an Actor
    • Engine-provided Notifies in AnimComposite does not work for this.
    • ATS provides an alternative for this

Output

The same spec as those without NiagaraSystems.

It means:

  • Sprites have Colors/Masks and Normals (no alpha/add blend)
  • Lit

How to setup

NiagaraSystem and material

NiagaraSystem needs to be deterministic.

Please check "Determinism" in emitter properties.

Blendmode of materials for renderer needs to be Opaque or Masked.

BaseColor needs to be connected.

ActorBP and Capture

NiagaraOnly Actor

Attach NiagaraComponent to plain ActorBP.

Since it doesn't have Skeletal animation, the length of animation needs to be set explicitly.

Character-Attached

Attach NiagaraComponent to SkeletalMeshComponent then it will follow skeletal mesh animations.


If you don't want Niagara effect to be always shown, uncheck "Auto Activate" and set some ComponentTag.

Then use AnimNotify_ActivateNS to turn on and off it (in AnimComposite or AnimSequence).


AnimToSprite Manual -Workflow with Paper2D and PaperZD-

A2S documentation has been moved to the Wiki.

This page may not be up-to-date.

github.com


Anim To Sprite and Paper2D / PaperZD

Contents:


Preparation

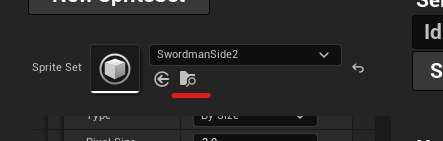
To enter the Paper2D / PaperZD workflow, check "Output Paper2D Assets" on the left bottom of the main Editor Utility Widget(named EUW_AnimSpriteCapture).


Then Paper2D sprites and flipbooks will be generated when the capture is performed.

The capturing procedure can be seen in the video below.

youtu.be


Paper2D Sprites

Automatically clipped sprites are generated with properties filled and ready to use. 

Pivot and pixel per unit

Automatically set.

Sprite character can be shown the same size and the same position as the original (captured) character.

Normal map

Automatically set.

This does not have an effect with the default material (unlit sprite material).

You need to use set a lit material on the Sprite or Flipbook component to show the character.

https://youtu.be/D7Z-B7ca7pA?si=EdfF4r2TWtdhoK8B&t=64

Sockets

If "SocketNames" are specified in CaptureSettings, captured socket transforms are automatically reflected into sprites.

Bone names are also valid here.


Paper2D Flipbooks

Flipbooks are also generated for each animation and direction (if set).

Framerate is set automatically and the animation is shown the same speed as the original skeletal animation (if its speed is not modified in the EUW).

youtu.be


PaperZD Multi-directional flipbooks

PaperZD in Code Plugins - UE Marketplace

PaperZD is a plugin that makes development of sprite based games significantly convenient.

Sprites and flipbooks made with AnimToSprite works well with it.

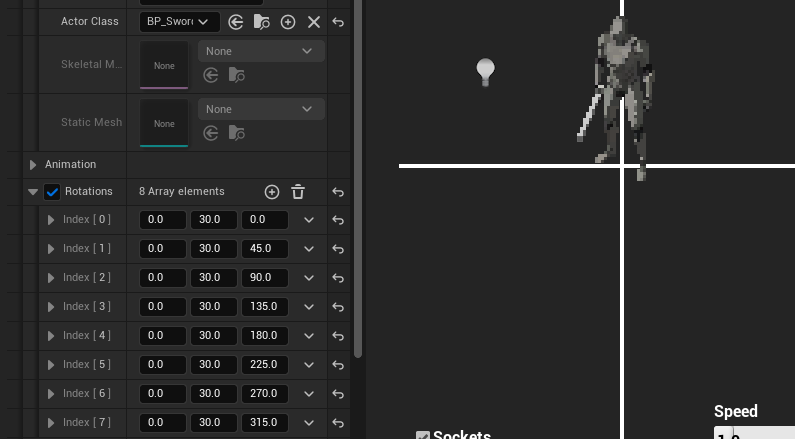
By setting multiple "Rotations" in the capture settings, flipbooks for each direction are created.
Set them in PaperZD AnimationSequence to define multi-directional animation.


AnimToSprite Manual

A2S documentation has been moved to the Wiki.

This page may not be up-to-date.

github.com


Contents:


Abount Anim To Sprite:

Store URL:

https://www.unrealengine.com/marketplace/ja/product/9b7b7956a8664490ad4c9e62f5af44a5

Support:

mail : nkdtr2011@gmail.com

What's New:

Ver1.9.4 (2024/3/12)

-Added a tool bar button to launch the capture tool

画像


Ver1.9.3 (2024/3/3)

-Fix issue : First time of optional capture


Ver1.9.2(2024/1/14)

-Socket transform modifying option for billboard


Ver1.9.1 (2024/1/10)

-Option to fix socket transform for billboard material

image.png

-Added a material for afterimage (using basecolor)

画像


Ver1.9 (2023/12/28)

-Afterimage effect (Caution : Paper2D is not supported yet)

nkdtr.hatenablog.com


Ver1.8 (2023/12/6)

-"Wake up" option (very advanced) to reduce intersections between sprites and walls especially in quarter-view

nkdtr.hatenablog.com


Ver1.7.2 (2023/12/5)

-Fixed animation playrate issue


Ver1.7.1 (2023/11/27)

-New option "Prefer Square Layout" to create textures as close to square as possible


Ver1.7 (2023/11/17)

-Optional captures can now be selected from a template

-Toon material now supports separate outlines map


Ver1.6 (2023/11/7)

-Emissive capture (as a new custom capture sample)

-Materials support emissive input

-Explicit additional texture index in custom capture for Paper2D sprite

-Fixed issue when animation playrate is not 1.0


Ver1.5 (2023/10/27)

-Specular / Roughness / Metallic capture support (optional)

-And custom capture

nkdtr.hatenablog.com


Ver1.4 (2023/10/18)

-Supported NiagaraSystem (with limitations)

 See the page below for its details.

nkdtr.hatenablog.com


Ver1.3.2 (2023/10/17)

-Supported modular characters with skeletalmesh parts those retarget pose using AnimBP(thanks to Corn Nuts)

-Fixed issue with LeaderPoseComponent in UE5.3


Ver1.3.1 (2023/9/17)

-Fixed error (stop by null access)


Ver1.3 (2023/9/14)

-Sockets preview in the EUW

-Sockets are exported to Paper2D Sprites

-Fixed issue (frame index error)


Ver1.2 (2023/9/7)

-Paper2D Sprites/Flipbooks generation support.

 Best with PaperZD :

  • Auto pixel size (flipbook characters are shown in the same size as their original Actor/SkeletalMesh)
  • Normal textures are also set
  • Auto pivot (the root point of the original characters become the pivot of sprites)
  • Multi-directional flipbook support (PaperZD)

youtu.be


Ver1.1 (2023/9/1)

-StaticMesh support


Ver1.0 (2023/7/27)

-Released

Brief:

youtu.be

Anim To Sprite can make pattern-animation texture from animated skeletalmeshes, supporting multi-direction, outlines.

Normal maps are also created, allowing sprites to be expressed with a rich lighting effect.


CAUTION : These characters are not contained in this plugin.


Paper2D/ZD compatibility:

nkdtr.hatenablog.com

Editor:

Editor Utility Widget:

Equipped with Editor Utility Widget to capture textures and data for rendering sprites.

There are various capturing options and preview sprite.

-various options:

  -directions

  -model (skeletal mesh / actor)

  -outlines

  -texture resolution

-preview with animation and lighting


Export and import:

Textures can be exported (as tga) and retouched with photoshop or other image editors.


more about the editor

nkdtr.hatenablog.com

Runtime:

Rendering:

Sprites are drawn as billboards(camera-faced) or quads, ordinary lit or toon.


CAUTION : These characters are not contained in this plugin.


Multi-direction supported.

Good for quarter-view, too.

more about runtime functionalities

nkdtr.hatenablog.com

Limitations / Known issues:

  • Not very good with Virtual Shadow Maps
    • It can cause artifacts in shadows
  • Translucency capture is not supported
  • When capturing, "PixelDepthOffset" in the material removes the pixel
    (it has 262144 times effect in orthographic view : probably an engine bug)

AnimToSprite Manual -Editor-

A2S documentation has been moved to the Wiki.

This page may not be up-to-date.

github.com


This page explains how to create an AnimSpriteSet.

An AnimSpriteSet is a combination of textures and information describing how they will be trimmed and displayed as a sprite.

Contents:


How To Make AnimSpriteSet

AnimSpriteSet is the data format handled by this plug-in and used to render the sprites.
It contains multiple animations and corresponds to a single sprite character.


youtu.be

Opening Editor

First, opening an empty level is recommended since the editor adds actor(s) on the current level.

And then run EUW_AnimSpriteCapture (Just click the tool bar button).


Editor parts description

①AnimSpriteSet

Creating new AnimSpriteSet

Press "New SpriteSet" button to create a new AnimSpriteSet.

Existing AnimSpriteSet

Set "Sprite Set" in ordinary way.

D&D / Select in content browser->arrow / Choose from the dropdown list.

②Common capture settings

Here are the basic settings for capturing.

These settings can be overridden for each animation.

Details of the settings are described below.

③Animation list(combo box) and new animation

To create a new animation

Enter a new animation name in the textbox to the left of the "Add" button and then press the "Add" button to create a new animation.

To select an existing animation

Choose from the combobox below the text "Select Animation".

Preview Sprite

A preview of the animated sprite is displayed here.

The display scale, orientation (if set), and animation speed can be changed via controls.

⑤Capture Buttons

Caution : Before doing this, animation should be set in the ⑥Animation specific capture settings. 

Preview

This button places actors and a frame indicating the capture area, allowing you to preview how they will be laid out on the texture.

Back view may be the best for this.


Capture

Capture is performed and textures are generated.
Textures are generated in the same folder as the AnimSpriteSet.


⑥Animation specific capture settings

First, the Animation section must be set up.
For "Anim to play" you can use AnimComposite as well as AnimSequence.

Other items inherit common settings(②), but can be overridden by turning on the checkboxes on the left.

Details for the Capture Settings

Properties:

[Cell Size]

This determines the size of the sprite in the scene and its resolution on the texture.

There are two ways to specify them.

- By Resolution : Sprite's size is determined by PixelSize and resolution("ResolutionX" and "ResolutionY" properties)

- By Size : Resolution is determined by PixelSize and Sprite's size("Cell Size" property)

"PixelSize" property is a common item that specifies the size of a single pixel in unreal units.

[Pivot UV]

Specifies the pivot point by a value relative to the sprite's size.
(0.5, 0.5) means the center of the sprite.

(0.5, 1.0) means the bottom center of the sprite.

[Frame Rate]

Specifies the number of frames per second.
A higher number of frames allows for smoother animations, but increases the texture size.

[Socket Names]

Transforms are recorded for the specified sockets.

This doesn't work well with Billboard materials (because they transform sprites according to the viewpoint).

[Model]

Here, you specify the shape data that will be used as the source of the sprite.
Two model types are available.

-Actor Class : Actor class (BP is good, too) with SkeletalMeshComponent

-Skeletal Mesh : Skeletal Mesh asset

"Model Direction" property specifies which is the "forward" direction of the model.

In most SkeletalMesh, Y+ is the forward direction, and in Actor, basically X+ is the forward direction.

[Animation]

Specifies the original animation of the sprite.

AnimSequence and AnimComposite are available here.

[Rotations]

Rotation applied to the model.

Multiple values makes multi-directional sprite (requires more texture size).

This button allows you to switch the rotation of the preview.

[Border Settings]

Mainly for outlines.

"DepthGapThreshold" specifies the depth gap (in unreal unit) threshold to make in-silhouette lines.

Small "DepthGapThreshold" case (lines appear around the right arm)

Large "DepthGapThreshold" case
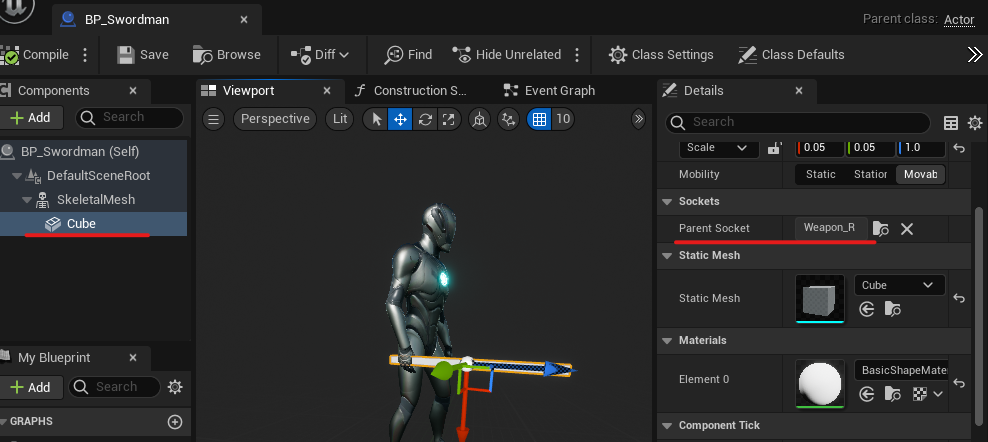
Other Features

To use modular characters

You need to create an Actor Blueprint to create a modular character sprite.

1. Static Mesh parts:

Simply attach a StaticMeshComponent to a Bone or Socket.

2. Skeletal Mesh parts with animation:

Caution : this character is not contained in the package

To sync skeletal meshes, there are some methods.

1 : SetLeaderPoseComponent (old : SetMasterPoseComponent)

Use MasterPoseComponent (Leader Pose Component in UE5.1 and later version) to combine the base SkeletalMeshComponent with the parts(they need to share the skeleton).

Modular Characters in Unreal Engine | Unreal Engine 5.0 Documentation

2 : AnimBP

If skeletons differs between the base skeletal mesh and the parts, you need to use AnimBP to match the poses.

Place the parts mesh under the base mesh in the hierarchy and parts should have AnimBP that copies / retargets poses from base.


Retouching

Textures can be exported (as .TGA files) and retouched in Photoshop or other image editors.

begore

after

A slash effect have been added.

By reimporting this over the original texture, the effect is added to the sprite animation.