Skinned Metaball Builder マニュアル -イントロダクション-


Skinned Metaball Builder Manual -イントロダクション-


概要 

"Skinned Metaball Builder" はメタボールでメッシュデータを生成する機能を提供するアセットです。

以下のような特徴があります:


エディタとランタイムいずれでも動作します.

www.youtube.com


- プラットフォームに依存していません.

- 作成したメッシュをAssetとして保存できます(Editorの場合).

- 自動的にスキニングされますので、アニメーションを付けるのに適します(オプション).

www.youtube.com


- シンプルながらテクスチャマッピングをサポートしています.

www.youtube.com


- Unityスクリプト(C#)で実装されており, カスタマイズが可能です.


クイックスタート

youtu.be

字幕ONで解説が表示されます(英語)

  1. "Metaball/Prefabs/SkinnedSeed" をシーンへドラッグ&ドロップします.
  2. ヒエラルキーから "SkinnedSeed.SourceTree" を選択します.
  3. "Ctrl+Shift+C" もしくは "Command+Shift+C" を入力して、ノードを追加します.
  4. それを移動させたり、 "base radius" を好きなように編集します.
  5. 3-4 を繰り返します(適宜ノードの追加先オブジェクトを選択し直します).
    "SourceTree"下のグラフ構造は、メッシュのビルド時にスケルトン情報へ反映されます.
  6. "Ctrl+Shift+R" または "Command+Shift+R" を入力し、メッシュをビルドします.
  7. エディタの実行ボタンを押した後"SkinnedSeed/BoneRoot"以下のノードを選択し,
    回転させてみてください(スキニングされている様子が確認できます).
  8. メニューコマンド"Metaball->SavePrefab"でグループ全体をPrefabとして、
    "Metaball->SaveMesh" でメッシュのみをセーブすることができます.

サンプル

3つのサンプルシーンがパッケージに含まれています.

それぞれシンプルに実装されていますが、このアセットの機能を知るために役立ちます.


1.Dungeon

www.youtube.com

"Dungeon" サンプルは実行中にメタボールメッシュを更新する方法を示しています.

洞窟の中を歩いたり、掘ったりすることができます.


操作方法:

A,W,S,D で移動

Space で「掘る」

マウスの移動で見回す 


2.Animations

f:id:nkdtr:20150603172052p:plain

"Animation" サンプルはスキニングされたモデルを動かす方法を紹介しています.

二つのオブジェクトを含んでいます:

-"Golem" : Unityのアニメーション

-"Tentacle" : 物理(Joint)

3.Models

色々なモデルのサンプルです.


技術情報

アルゴリズムを知ることはパラメーターの調節やカスタマイズの助けになります.


メタボール曲面の生成


1. メタボール情報(中心の座標、半径、濃度)を元にスカラー場(格子点にスカラー値を割り当てたもの)を計算します.

2. 「マーチングキューブス」アルゴリズムによりメッシュ情報に変換します( Marching cubes - Wikipedia, the free encyclopedia ).


制約、限界

  • 格子点や頂点の数にリミットを設けてあります (デフォルト値 1000000/300000).
    これはソースコードMetaballBuilder.csに定義されています.
    "_maxGridCellCount", "_maxVertexCount"で検索してください.
    注意 : 格子点や頂点数が大きすぎる場合、システムのフリーズを招く恐れがあります.
  • 格子点の数によっては、メッシュのビルドに長い時間がかかります.
    毎フレームのビルドには不向きです (低い解像度のメタボールを扱う場合や、ハイスペックマシンでの動作を前提とする場合は例外です).
  • メッシュに対して一つのマテリアルのみ割り当てられます.
  • テクスチャマッピングについてはシンプルな平行投影のみをサポートしています.


Skinned Metaball Builder Manual -Tips- (English)

Skinned Metaball Builder Manual -Tips-


Tips. 


Confirm metaball structure (Skinned Metaball)

f:id:nkdtr:20150608180556p:plain

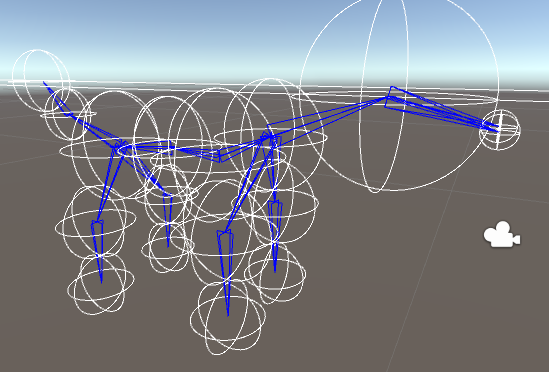
Disable "SkinnedMesh" or "StaticMesh" to see metaball structure (and bones for Skinned).


Convert From Static to Skinned (or reverse)

Just copy GameObject tree under "SourceRoot" to other MetaballSeed (Static or Skinned) and the metaball structure is ported.

But some parameter modification on seed may be required.


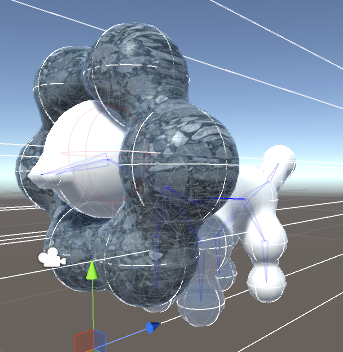
Using multiple Materials

f:id:nkdtr:20150608183415p:plain

One metaball mesh can be rendered with only one material.

But you can simply combine ones (although they are not blended).


Deletable Objects

After you created your mesh, some of GameObjects and Components can be deleted.

- MetaballSeed(Static/Skinned) component

- SourceRoot GameObject (and its children)

- TextureGuide GameObject

- MetaballCellObject component (but it is recommend to set MetaballSeed's "CellObjPrefab" null and rebuild mesh instead)

Although the mesh will not be modified, doing this helps you publish your model data without dependency on this asset.


Usage of "CellObjPrefab"

Although it is set to null by default,

CellObjPrefab can be used in various ways.

- Building Joint connection ( see "Tentacle" in "Animation" sample scene )

- As "handles" to control bones ( for skinned metaball )

- As "waypoints" for AI ( "Dungeon" like usage )


Building mesh fails

In most case, it is because of exceeding the limitation of the number of grid cells.

In that case, an error message says

"Too many grid cells for building mesh (1168200 > 1000000 ).
Make the area smaller or set larger (MetaballSeedBase.gridSize)."

To solve the error, follow the message.

Another solution is to modify the limit value

(

    "MetaballBuilder.cs"
    const int _maxGridCellCount = 1000000;

).

But using too many grid cells may cause your system freeze

(the capacity depends on the spec and condition of your system).


Logs says mesh has been leaked

When you build a mesh and save the scene, you may see a log saying

"Cleaning up leaked objects in scene since no game object, component or manager is referencing them
 Mesh  has been leaked (some number) times."

But it seems that there are no actual leaks in usual case.

Skinned Metaball Builder Manual (English)

Skinned Metaball Builder Manual

Store URL :

https://www.assetstore.unity3d.com/en/#!/content/38054

Support :

mail : nkdtr2011@gmail.com

twitter : @NKDTR (usually tweets in Japanese, but can reply in English, too)


What's new

ver 1.121 released(2020/12/10)

-Added a sample material with vertex color

ver 1.12 released(2020/12/09)

-Vertex color supported (with blending between nodes)

But not for "IncrementalModeling" mode yet.

f:id:nkdtr:20201208142737p:plain


ver 1.10 released(2015/09/17)

-new feature "IncrementalModeling" mode

 -introduction -> (http://nkdtr.hatenablog.com/entry/2015/09/19/231458)

-"Place Metaball" shortcut changed to "Shift+Ctrl(Command)+E"

  (it was "Shift+Ctrl(Command)+C" before, being the same as "Open console")


1. Introduction

 Introduction of "Skinned Metaball Builder" and quick start guide.


nkdtr.hatenablog.com


2. Reference

 Properties, Menu Commands, APIs.


nkdtr.hatenablog.com


3. Tips

 Tips.


nkdtr.hatenablog.com


Skinned Metaball Builder Manual -Introduction- (English)


Skinned Metaball Builder Manual -Introduction-


Brief Summary 

"Skinned Metaball Builder" is a Unity Asset that provides a functionality of Making Mesh data via metaball with features:


Works on editor and at runtime.

www.youtube.com


- No dependency on platforms.


- Created mesh can be saved as an asset.


- Skinned (optional) so that mesh can be animated.

www.youtube.com


- With "skeleton" objects for various use.


- Support simple linear-projection texture mapping

www.youtube.com


- Fully implemented with Unity C# script, letting you customize.


Quick Start

youtu.be

<Turn on "CC" for explanation.

  1. Drag and drop "Metaball/Prefabs/SkinnedSeed" into your scene.
  2. Choose "SkinnedSeed/SourceTree" in hierarchy.
  3. "Ctrl+Shift+C" or "Command+Shift+C" to create a new metaball node.
  4. Move it, modify its "base radius" as you like.
  5. Repeat 3-4 (Changing node selection to be the parent of new node).
    The hierarchy under "SourceTree" is reflected into the "skeleton" generated later.
  6. "Ctrl+Shift+R" or "Command+Shift+R" to generate mesh.
  7. Press "run" button in editor,
    select some node under "SkinnedSeed/BoneRoot",
    and rotate it to confirm that your mesh transforms.
  8. "Metaball->SavePrefab" to save full prefab
    or "Metaball->SaveMesh" to save mesh only.

Samples

Three samples within package.

Each implementation is quite simple and easy,
but introduces well about this asset.


1.Dungeon

www.youtube.com

"Dungeon" sample shows how to modify mesh at runtime.

You can walk and dig through metaball-modeled dungeon.


Controls:

A,W,S,D to move

Space to "dig"

Mouse move to look around 


2.Animations

f:id:nkdtr:20150603172052p:plain

"Animation" sample shows how to animate skinned mesh.

Two objects are contained:

-"Golem" : Unity animation

-"Tentacle" : Physics (joint)

3.Models

Various objects :)


Technical Introduction

Knowing about the algorithm helps you to find good parameter values.

Creating a metaball surface


1. Calcurate and fill scalar field by metaballs information (center, radius and density).

2. Create mesh data from the scalar field via "marching cubes" algorithm( Marching cubes - Wikipedia, the free encyclopedia ).


Limitations

  • Numbers of grid cells and vertices are limited (1000000/300000 by default).
    These are defined in MetaballBuilder.cs.
    Search "_maxGridCellCount", "_maxVertexCount".
    Be careful : building mesh with too large values may Freeze your system.
  • Rebuilding mesh may take long time depending largely on the grid size.
    Per-frame rebuild is not recommended (excluding cases that you require low-resolution metaball or you suppose your application to run on a monster PC).
  • Only one material can be applied per mesh.
  • Texture mapping is supported but simple linear-projection only.


Skinned Metaball Builder Manual -Reference- (English)

Skinned Metaball Builder Manual -Reference-


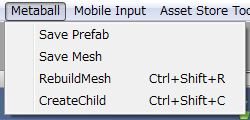
0. Menu Commands
 

f:id:nkdtr:20150604194340p:plain


Save Prefab :

 Enabled only when a GameObject under MetaballSeed is selected.

 Saves selected metaball structure as a prefab.

 (If you drag & drop it to the project view (normal process of creating prefab), mesh data will not be set on the prefab because the mesh data is not asset but belongs to scene).

Save Mesh :

 Enabled only when a GameObject under MetaballSeed is selected.

 Saves mesh data only as an asset.

 The mesh data can be used for mesh filter, mesh collider and so on.

RebuildMesh :

 Enabled only when a GameObject under MetaballSeed is selected.

 Builds mesh by the metaball nodes.

CreateChild :

 Enabled only when a GameObject under MetaballNode is selected.

 Adds a GameObject with MetaballNode component under the selected GameObject.


1. SkinnedMetaballSeed / StaticMetaballSeed component

 Component to build a metaball mesh.

There are Skinned and Static MetaballSeed component.

Skinned doubles as Static except that building mesh costs a little bit higher (in memory usage and calculation time).


Properties

 If you use prefab (two prefabs are contained in folder "Metaball/Prefabs"), all the properties required for just making your mesh are set.

But this document will help you adjust properties for your application.
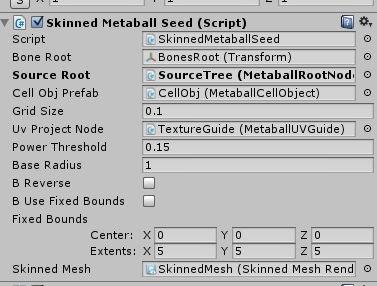
f:id:nkdtr:20150604160409p:plain

Bone Root :

 Node under which "skeleton" objects are automatically constructed by this tool.

 Also used for SkinnedMeshRenderer's "RootBone".

Source Root :

 Node under which metaball data is defined by user (or application script).

Every GameObject under this is supposed to have "MetaballNode" component.

 Shortcut command "Ctrl(Command) + Shift + C" (create child metaball node) is enabled when a GameObject under this is selected.

Cell Obj Prefab :

 Prefab for nodes under constructed "skeleton".

 Component "MetaballCellObject" is required to be attached.

 This can be null if you don't need special behavior of your metaball at all.

Grid Size :

 Size of cells in grid (refer http://en.wikipedia.org/wiki/Marching_cubes for details).

 Small size means, high-def mesh and high-processing cost,

and large size vice versa.

Auto Grid Size (Ver1.02~)

 Ignoring "Grid Size", use automatically decided grid size by "Auto Grid Quality".

Auto Grid Quality (Ver1.02~)

 Parameter to define grid size (if Auto Grid Size is checked).

Higher value means higher resolution of mesh (small grid size).

UV Project Node :

 Guide node for texture coordinates.

 Wired cube is displayed as a gizmo to show how the texture is applied.

 Using non-repeat ("wrap mode"=clamp) texture is easy way to confirm how this works.

Power Threshold :

 Value to determine "inside" points from scalar field calculated via metaball.

 Smaller threshold means larger area becomes inside ( larger mesh created ).

Base Radius :

 This is just for editor.

 Radius of created metaball node is set to this value by default.

B Reverse :

 If true, create mesh become reverse-surfaced.

 Useful to create dungeons (see "Dungeon" sample).

B Use Fixed Bounds :

 If true, following property "Fixed Bounds" is enabled,

so that marching cubes grid area is fixed.

 If false, bounds are automatically calcurated by metaballs info.

 This is useful if you want your mesh to be stable (otherwise, change of bounding box have a slight effect on each vertex position).

 But be careful, mesh will be cut off at the bounds.

Fixed Bounds :

 See "B Use Fixed Bounds".

B Use Color :
 If true, created mesh contains vertex colors.

Each color is interpolated between MetaballNodes.


SkinnedMesh (SkinnedMetaballSeed) :

 Renderer to receive the created mesh.

MeshFilter (StaticMetaballSeed) :

 Mesh filter to receive the created mesh.


APIs

void CreateMesh();

 Recreate mesh by metaballs information.

Same effect as menu command "Rebuild Mesh".


Mesh Mesh { get; set; } 

 Get or set current mesh data.


2. Metaball Node component


f:id:nkdtr:20150604203818p:plain

Properties

Base Radius 

 Radius of metaball.

Be careful that metaball radius is not affected by scale of transform.

B Subtract

 If true, metaball become subtractive.

Base Color

 Color of node, applied to vertex colors if the MetaballSeed is checked with "B Use Color"

【UE4】 マテリアルエディタのシェーダーコード生成についてちょっとね

# 結論
* Customノードは関数、頑張れば別のCustomノードで呼び出して使える
* MaterialFunctionは展開される。Customノードからの呼び出しはできない


# 実験
1. Customノードを関数として呼び出してみる

以下の条件を満たすときこれが可能。
* 呼び出されるCustom関数が実際に使われている(使われていないとコードから除外される)
* 呼び出されるCustom関数が呼び出し部分より手前で定義されている

f:id:nkdtr:20141216003142p:plain

こんなのを作った。

sin_custom の中身

sin(x)

test_customの中身

CustomExpression0(Parameters, x)


sin_customには0を入力しているので出力も0.

それをAddに使っているので実際には何の効力もないが、

無理やりにでも使っておかないとコードが生成されないのでこんな感じにした。

test_customの中身が今回のミソで、

Customノードがシェーダーコードに変換されるとき、

* CustomExpressionX(Xには0から順に整数が割り当てられる)という名前の関数になる

* Parametersという名前の引数が最初に付加される

ということを反映している。

実際のコードはWindow->HLSL Code で見ることができ、

今回のsin_customについては以下のようなコードに変換されていた。


MaterialFloat3 CustomExpression0(FMaterialPixelParameters Parameters,MaterialFloat x)
{
return sin(x);
}


関数名につく数字はシェーダーコードが生成されるたびに割り当てなおされるので、

マテリアルをいじると変わる場合がある。

したがってこの呼び出し方はよほどの事情がない限り行わない方がよい。


なお、WorldPositionOffsetなど頂点シェーダーとして解釈される部分についてはParametersの型が異なってくるため、ピクセルシェーダー側との互換性が無い。


2. MaterialFunctionノードによるシェーダーコードの検証

f:id:nkdtr:20141216004612p:plain

こんなのを作った。

コードを見つけやすいように0.12345という変な値を入れておいた。

出てきたシェーダーコードがこれ。

half3 GetMaterialEmissiveRaw(FMaterialPixelParameters Parameters)
{
MaterialFloat Local0 = (MaterialFloat2(0.00000000,0.00000000).r * MaterialFloat2(0.12345000,0.00000000).r);
MaterialFloat Local1 = (MaterialFloat2(0.00000000,0.00000000).g * MaterialFloat2(0.12345000,0.00000000).g);
MaterialFloat Local2 = (Local0 - Local1);
MaterialFloat Local3 = (MaterialFloat2(0.00000000,0.00000000).r * MaterialFloat2(0.12345000,0.00000000).g);
MaterialFloat Local4 = (MaterialFloat2(0.00000000,0.00000000).g * MaterialFloat2(0.12345000,0.00000000).r);
MaterialFloat Local5 = (Local3 + Local4);
MaterialFloat3 Local6 = (MaterialFloat3(MaterialFloat2(Local2,Local5),0) + Material.VectorExpressions[0].rgb);
return Local6;;
}

どう見ても展開されている。

MF_MultComplex はVector2を複素数と見なして乗算した結果を返すもので、

一応載せておくと下のようなもの。

f:id:nkdtr:20141216004836p:plain

実装内容によって展開されないこともあるのかもしれないが、

試した限りではこういう結果になった。